Blog | Tag: tutorials
January 23, 2014
Quickly Accessing Resources in a BYOD Classroom
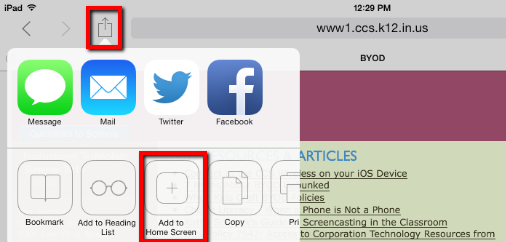
Our district is using a BYOD (Bring Your Own Device) model, and just last week I worked with all five second grade classrooms at one of our buildings as they brought in their devices for the first time, which was an exciting and fairly large scale project! Their goal was to use some of the databases we provide to our students to do some research.
The first day of bringing in devices can be a little bumpy and seem a little time consuming, but that’s usually just because it’s the first time students have connected to the district’s wireless network and they may need help (especially in the primary grades) with this step. The good news is that going forward, their device will remember and auto-connect to the school’s wireless the next time they bring it to class, so this is usually only a bump on day one that you don’t have to take time to address every time. (more…)
December 10, 2013
Padlet in the Classroom

I’m always looking for cool tools that can serve lots of purposes in the classroom. Tools that make life easier for teachers AND are more engaging for students in meaningful, educational ways are sure winners, and Padlet is currently one of my favorites. It’s a great tool for formative assessment that also doubles as a collaborative way for students (or teachers) to connect with each other, too! Students collaborate on a shared wall space and YOU get all of the evidence you need to see if students “get it” or not. It’s pretty magical!
Padlet.com is a free web 2.0 tool for teachers. With an account, a teacher can create unlimited shared wall spaces that are great for collaboration between students or colleagues. Create a wall and share it with students; they don’t need to have an account to collaborate on the wall.
When you make a Padlet wall, you as the owner have control over how it looks and functions. Set the background, give it a title and description (the perfect space for instructions) and even give it a personalized URL. All walls have their own unique URL, which is how you share it with others.You can even password protect your wall, so you’ll be confident linking to your collaborative wall on your classroom webpage for students; just be sure they know the password to access the wall. And because it’s web-based, this means it can be accessed from anywhere with internet access. (A great tool for flipped classroom setups.)

To add to the wall, simply double click (or double tap, as it works perfectly in the browser of any personal device, too!) and you’ll create a new post-it note. You’re able to add a heading or title to your note (a great place for students to type their names to help distinguish and identify their notes from others) and text in the body of the note. Notes are re-sizable and the owner of a note can move it around on the wall. The best part? You’re not limited to just text on a note; you can also attach other things to your notes: add a URL to other websites or videos, upload a file (hello, assignment turn-in!) or take a photo using your computer’s webcam.

I love using Padlet for exit slips. For example, I presented BYOD to our secondary admin at a meeting. At the end, I directed them to a Padlet wall I had created where I wanted them to add a note and tell me what kind of support they wanted for their building, so that I knew how to follow up with them and set up future trainings. Of course, with the nature of posting “notes” to a wall, the notes were all over the wall in no particular order by the end. This is the beauty of Padlet – I collected the data from “students” and then as the owner of the wall, I can go back to it later and rearrange the notes in a meaningful way for ME so that I can analyze the data. I arranged the notes by building so that I could see what each building’s needs were, and then I added a note myself underneath each building’s cluster of notes to remind myself how and when I contacted those admin to arrange the follow up supports they wanted. Even 3 months later, I can go back and tell you on what date and how I followed up with those administrators.
For a practical classroom example, let’s say you asked your kindergarten class to add a post-it to your wall with a word that has a long “A” sound in it. Whether students are 1:1, BYOD, or you have a “station” with the wall up on a classroom computer and students rotate through and add a post-it sometime during the day, at the end of the day YOU have a wall of notes, one per student, and now you can arrange the notes in a meaningful way to analyze who gets it and who doesn’t. Over here are all the kids who got it, over here are all the ones who didn’t. Now you know who needs more work with the long “A” sound. Change up the question depending on the topic, grade level, etc.

This tool isn’t just for students: you can use Padlet to collaborate with your colleagues or collect resources and images for an upcoming project with your department or grade level team all in one place together.
I worked with a secondary art teacher who wanted to take her class on a walking field trip through the building with their devices. Students were to use their device to take pictures of various elements of art that they had been learning about – texture, space, line, etc. Her dilemma was then how to have all of those images shared back with her so she knew if they understood the concepts or not. Solution? She created a Padlet wall and shared it with the class. When students were done with the activity, they were able to access the wall right in the browser of their devices, and using the Upload File option, attach pictures right from their camera rolls onto their post-it. So Joe adds a note with his name on it and types, “This is my example of texture” and attaches the picture he took representing texture to the note. Bam. All students do it, and now all students can see each others’ photos and more importantly, the teacher can tell who gets it and who doesn’t. Or perhaps students can analyze the results and weigh in on whether or not they make sense. All in one place.

Padlet is great for “parking lot” or “check in to check out” activities. Imagine a gym class where the teacher asks students to share how they beat their personal best this week, or a music class where students add a post-it to the wall to share what imagery came to mind as they listened to a specific piece of music.
Students can cite evidence from text in a close reading activity using a Padlet wall. I worked with a teacher who asked students whether they had free speech or not. After accessing various articles on what free speech is, students were then asked to support their opinion on the Padlet wall, citing evidence from the text that they read. This kind of activity spans all grade levels; citing evidence and supporting your opinion is a key skill at any age.

What about a KWL chart? By using a different background on your Padlet wall, (or uploading your own) and adding headings yourself ahead of time to define the K-W-L spaces on the wall, students can then add post-its and place them under the proper category to share what they Know, what they Want to know, or what they Learned. And speaking of using Padlet to categorize notes, you could also use it as a space to collaborate on a schedule or have students organize their responses in a certain way. It’s important to note that the teacher is the only one with a Padlet account; and the owner of the account/wall is the only one who has control to move ALL of the notes around. Students connected to the wall can only modify, edit, or move THEIR own notes around, but not the notes put up by others. Keeping Padlet’s Terms of Use in mind, accounts can only be created by those 13 and older, so in the elementary realm this would be the teacher only, but secondary students could make their own Padlet accounts and set up their own walls so that they have a collaborative space to work with peers on group projects. (To achieve a collaborative space for group projects in the elementary, the teacher could make all of the walls and share the different wall URLs with teammates.) Speaking of TOU, don’t forget that teachers of students under 13 should notify parents and seek permission for students to use the service to post notes on your wall(s) before continuing. You can access that information here: Padlet’s Terms of Service

Here’s another cool idea – you as the teacher set up a wall and link to a video news article online. Your instructions are for students to watch the video, and then post a note in response to the video on the wall. What I love is that you achieve this by inserting the URL to a YouTube video, for example, and students can watch the video embedded right on the wall instead of clicking off to another page or window. Then they can post their response right away, next to the video clip. This also works by linking to a specific news article or website; students access the link to the article or website and read it, then come back to the wall and post in response to a question you pose about what they read.

Another unique way to use a Padlet wall is as a communication tool for parents and students on your classroom webpage. Think of it as a forum; set up your Padlet wall so that notes post in a column layout, (this means anytime someone adds a post-it note, it goes in a column stream on the wall instead of anywhere randomly on the page) and you’ll be able to see the latest notes posted at the bottom. Students could post a note ask for homework help, and anyone from class – you or another classmate – can add a note to respond and help. You can also share information with parents by posting a note, and attach any relevant files, images, or URLs they may need. This turns the Padlet wall into a stream of interactive conversation. If you password protect your wall, it only becomes accessible to your students and parents. (Just don’t forget to share the password with them!)

Whew! There are tons of ways that Padlet could be used effectively in the educational space, and the list keeps growing. Padlet even has a gallery of ways people use it that you can check out. How would YOU use Padlet in the classroom? Contribute your ideas to this public Padlet wall!
Posted in reviews, tutorials, web 2.0 tools | By Mrs. K
November 25, 2013
Using PollEverywhere.com for Formative Assessment

I enjoy opening a PD session with a quick poll that I made at PollEverywhere.com. I often use polls as an anticipatory guide to let me gauge where my audience is before we start, or to get them excited and thinking about the upcoming lesson. The quick data that I can collect with an interactive poll helps me adjust my teaching to fit my audience’s needs.
For example, if I’m holding a training session on Google Docs, I may have a poll up as people are arriving to ask them their comfort level with Google Docs at that moment, before the training. I can look at the results quickly before I start and tune my training accordingly based on the data; if most people have zero experience with Google Docs, I would teach differently than I would if I had a large group of people with experience. And if I have some that identify as intermediate or expert, I have some more challenging “take it to the next level” activities in my back pocket for them. Though this data is anonymous and depicts the group as a whole, it still helps me differentiate and support the full spectrum of needs thanks to a quick poll with instant, live results I can use right away.
PollEverywhere is a great formative assessment tool.You can sign up for a free account at PollEverywhere.com. There is the option to upgrade to a paid, premium account (which gives you the ability to enable student registration and grading), but I’m happy with the capabilities of the free account for my needs. Remember – I am just looking for quick, instant feedback to help drive my next lesson or gauge my audience on the fly.
There are two types of questions that you can create: multiple choice or open-ended.
Multiple Choice Poll Questions

When creating a multiple choice question in PollEverywhere, you can give options as text or use images to represent poll choices instead. I love using images as poll options for the primary grades! Multiple choice questions give you the ability to find out if students know or remember something you’ve previously shared. You can start the day with a multiple choice poll to see if students remember the take-away from the previous day’s lesson. You could also ask students a question to gauge their understanding before beginning a new lesson to see how many may already know the answer. I also like using multiple choice poll questions as a “digital fist to five” as I mentioned previously, where students can tell me on a scale what their comfort level or understanding is before or after a lesson.

I also like asking a question at the start of a lesson, and then asking the same question (in a separate poll) at the end of a lesson, to see how responses may have changed after gaining new knowledge during the lesson, or to show student growth as a result of the lesson. As a real life example, students in a 4th grade classroom were asked at the start of a lesson whether or not they had free speech as a student. Their options were Yes or No. We displayed the results to show them what everyone thought before the lesson. Then we did a variety of close reading activities and had curated some interesting age-appropriate articles that students read and jigsawed collaboratively, and at the end of the lesson, we posed the same question – do you have free speech as a student? Based on the resources they’d read to learn more about what free speech is and real life examples that they could relate to, they voted again, Yes or No. Because we did this in two separate polls using the same question, we were able to analyze the before and after results. Imagine how powerful this could be! It’s one thing to ask kids to raise their hand or do a thumbs-up, thumbs-down, but when you record results in a poll, you can take the responses to the next level and let the students analyze the visual results, too.
 |
| Analyzing results: Before (left) and After (right) |
Open-Ended Poll Questions

Open-ended polls let you ask an open-ended question that could require a phrase or varied response as opposed to a set multiple choice answer. For example I could ask, “What is one thing you already know about volcanoes?” and students could share their varying responses similar to how you might use a traditional KWL chart. (Of course I could then follow up with an open-ended poll question to ask what they want to know, and later on to have students tell me at least one thing they learned, too!)

A real life example of using an open-ended poll question involves asking students to use the first word that comes to mind to describe a character in a book you’ve just read, or one you’re currently reading. If I asked 2nd graders to describe Amelia Bedelia as an open-ended poll and chose the output method to be word cloud, then their results would appear on screen in a word cloud, meaning words that are used by lots of students will be larger so you can see the words that were used the most often to describe the character. To make this more meaningful at higher levels, if the character in a book goes through some significant character development during the story, you may want to pause and do this activity in the beginning, and then again at the end, to see how the word clouds for the characters have changed.

Supporting BYOD and Technology Integration
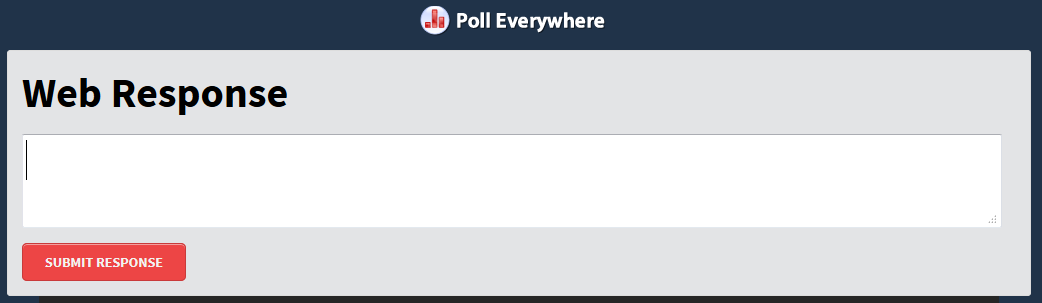
PollEverywhere.com is a web-based tool that can be used to support BYOD (Bring Your Own Device) models or 1:1. You’re not limited to just texting in a response to a poll, though that is certainly an option I’ve used with adults before, but responders can use the web response form (located at http://pollev.com) in the browser of any device – laptop, smartphone, tablet, desktop computer, etc. – to answer poll questions. In the free speech example above, students in the classroom had a combination of laptops they borrowed from the school and their own devices that they brought in. I LOVE browser based tools that support technology integration regardless of tech model. If you have a limited number of devices to use, you can always have students group up and collaborate on the question, coming to a consensus and then voting as a group. You could also use the device as a “station” – by refreshing the web response page at pollev.com after submitting your response, you’re free to submit another response. So one student could respond, hit refresh, and another student could then respond as well.
The possibilities seem endless, and it’s such a quick way to gather informal data that you can turn around and act upon immediately. Head on over to PollEverywhere.com and make an account today!
Posted in reviews, tutorials, web 2.0 tools | By Mrs. K
June 6, 2013
A Video Tour of LearnZillion.com’s Features
It’s no secret based on my post a month ago, (Learn a Zillion Things at LearnZillion!) that I’m a big fan of LearnZillion.com.
As I prepare for the professional development opportunities that I’m offering to our staff this summer, I’m including a plug for LearnZillion as part of a BYOD training. It’s just one of several tools that I’ll be highlighting in the context of bringing your own device. While developing my BYOD session, I wanted to “flip” the training and offer some quick video clips to introduce the variety of tools in rotating stations for teachers so that they could explore. While I like that LearnZillion has several short video snippets to help you navigate your new account once you’re logged in, I decided to record my own quick intro video tour of LearnZillion.com’s features to use in training, and to introduce others who may not have an account yet to the tool.
Maybe this feature tour will get you as excited about LearnZillion as I am, and inspire you to create your own (FREE) teacher account and get started! You’ll be happy to know that if you need any help along the way once you’re registered, that LearnZillion has got you covered with helpful tutorial clips every step of the way. And if you’re wondering what the fuss is all about, you may want to check out my first LearnZillion post to get the additional scoop.
You’re still reading? What are you waiting for?! Get started with LearnZillion today.
Posted in reviews, tutorials, web 2.0 tools | By Mrs. K
April 30, 2013
Use Guided Access to Enable “Kid Mode” on your iPad

Ever wished you could disable the Home button or other menu buttons in an app when your iPad is in younger hands?
I admit as a mom, the inspiration for this post came from my own personal experience of having a two year old and wanting him to start using my iPad more frequently. I had downloaded so many great educational apps for him, but let’s be honest… most of his time on the iPad up until now was spent helping him get back into his app, because he kept accidentally (or curiously, over and over again as a two year old often does) hitting the menu button and exiting out. Not to mention I didn’t really want him sending tweets or emails on my behalf then, by mistake. I wanted to hand him the iPad with confidence until he had a better idea of what he was doing, but I also didn’t want to install 3rd party apps specifically designed for such a task. Isn’t there something built in to my iPad OS?
It turns out there is, and it’s called Guided Access. (Note: the following works on iOS 6+)
1. Tap to enter your Settings and select General. Find Accessibility.

2. Press to enter Accessibility and scroll down to the Learning section; tap on Guided Access

3. Flip the Guided Access switch ON, and tap Set Passcode to enter the passcode you want to use to exit out of Guided Access mode when in an app later. I recommend flipping the Enable Screen Sleep switch ON to help save battery life, too.

Now that you’ve configured Guided Access, you can exit Settings and open any app. To lock into the app, triple press the Home button to bring up the Guided Access menu for that app.
By default, you’ll see that Touch capabilities and Motion capabilities are turned on. I like that you even have the ability to draw on the screen to optionally define other specific areas within the app you want to disable. For example, my son loves one of the puzzle apps I’ve downloaded. There’s a home button to go back and pick a new puzzle, but there’s another button on the screen that takes him to the app’s credits. My two year old doesn’t need to get stuck on the credits screen of the app, so while I’d leave the app’s home menu button alone, I could draw a circle around the credits button to disable it from working while in Guided Access mode.
Now that you’re ready to go, press the blue Start button to begin running the app in “Kid Mode.” You’re now locked in with the settings you defined.

To exit “Kid Mode,” simply triple click the Home button again. You’ll be required to enter the passcode you set above in step 3.
While the inspiration for this post was personal, it could have relevance in the classroom as well, especially for really young students just starting out who could use this support. Perhaps if you’re using a specific app for content on a few iPads at centers in your classroom, having this trick up your sleeve will allow you to lock in to the specific app they should be using at the center so that you know they are on task during their small group rotation. It’s definitely not something I’d want to use all the time, or with the more experienced student who doesn’t need to be locked into an app, or a student on their own iPad, as the beauty of using a device like the iPad is having access to a wide variety of apps they may need or want to use to enhance their learning… but there may be a very specific time or two where you may be glad you knew you could do this. Even if it’s just to disable a single button within the app that allows you to purchase something! (Ask me how I know.) :)
Posted in apps for edu, tutorials | By Mrs. K
April 10, 2013
Google Apps for Education: Using Shared Folders in the Classroom
Our district uses Google Apps for Education. All staff and students have their own district Google Drive (formerly Google Docs) account. A lot of our teachers have dug right in because of Google’s rich collaboration functionality, and their excitement has been spreading… every day, I see more and more staff members getting their feet wet by exploring other ways that Google Drive can enhance their classroom experience and engage students.
There’s not just one way to use Google Drive in the classroom. Most who have attended my introductory professional development go on to use the basics of what Google Drive has to offer right away: collaboration on documents. But there’s so much more that you can do when you think outside the box!
A Shared Classroom Space on Google Drive
I had a secondary art teacher contact me to tell me about a project she was doing where students would be taking pictures with their smartphones of various aspects of art that they found in everyday situations. See a great example of color, line, or perspective while you’re at the mall? Snap a picture! Kids were given a week to take photos on their phones. But then she was stuck… she wanted a single place, accessible to all students in the class, to access all of the photos. One solution we came up with was for the teacher to create a shared folder on Google Drive, shared with all students in the class. Often we’re comfortable with sharing individual documents and files on Google Drive because that’s what we do the most, but forget that we can apply share settings to an entire folder as well.
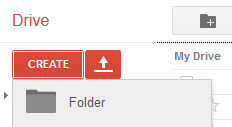
Click the Create button and create a new Folder. From your dashboard, select the folder and press the Share button at the top of the screen. Now you can share this folder with multiple people just like you would share an individual document with multiple people. The cool thing about this is that now anything you upload to this shared folder going forward is automatically accessible to everyone that the folder has been shared with. (Also a good tip so that you only have to share something one time with 30+ students, instead of having to share every document you upload individually with 30+ students every time.)

The next step in this case was to have students install the Google Drive app (free) on their devices, from their device’s respective app store. Once they had logged in to their school Google Drive account via the app, they were able to find the folder their teacher had shared with them. (Under the Shared With Me section; they can then select the folder and click the Add to My Drive button.)


Once they’d added the folder to their drive, students could upload the images from their photo roll on their device right into that shared folder. They could now also browse (and download) all of the pictures that their peers put up, too. The teacher had essentially created a database of images related to her art project in the shared folder on Google Drive. Since the teacher was the owner of the shared folder, she had complete control over monitoring the images uploaded, and was notified when new files were uploaded so that she could keep an eye to make sure the images were appropriate. (And could tell who uploaded the photo in the event of an issue.)
Turning In Assignments via Google Drive
But what if you want students to turn in a homework assignment via Google Drive? It’s kind of the same idea, but from the students’ side this time. The student would create a folder on their Google Drive account and title it “Ann Smith’s Assignments” for example, and share that folder with just their teacher. Anything the student uploads or creates in that shared folder is automatically available to their teacher.

When the teacher logs in to their Google Drive account and looks under the Shared With Me section, they’ll see one folder for each of their students. (I’d recommend having students use a consistent naming convention to make organizing your Google Drive easier – i.e. requiring them use their first and last name and/or class/period number, etc.) Because of the shared folder functionality, teachers will now have access to anything the student puts into their shared assignment folder going forward, making this a way for students to turn in assignments to their teacher from anywhere.
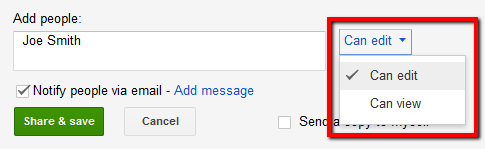
One last thing…
Don’t forget that the permissions you give to a folder will be applied to everything in the folder, so if you share the folder with others giving them Can Edit rights, (vs. Can View rights) any files that you upload or create in that folder will automatically be shared with everyone on the folder with those same rights.
How do YOU use shared folders to think outside the box when it comes to using Google Drive in your classroom?
Posted in BYOD, tutorials, web 2.0 tools | By Mrs. K


CAM Technology Coordinator
CAM Tech Department Team Leader
CAM Webmaster